How to Install Vinyl Plank Flooring on a Concrete Floor: Step-by-Step DIY Guide
Installing vinyl plank flooring on a concrete floor doesn't have to be difficult. Follow this step-by-step DIY guide based on my real bedroom renovation, including preparation tips, tools, common mistakes to avoid, and lessons learned to help you achieve professional-looking results.
Fred Artisan
7/22/20264 min read
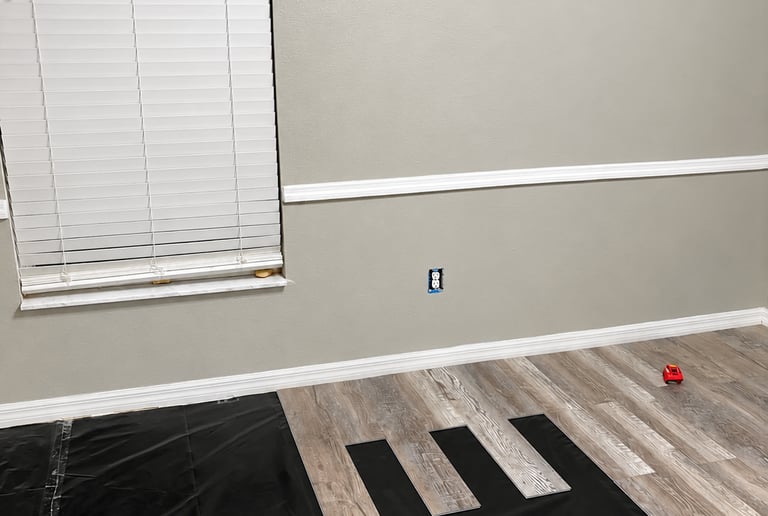
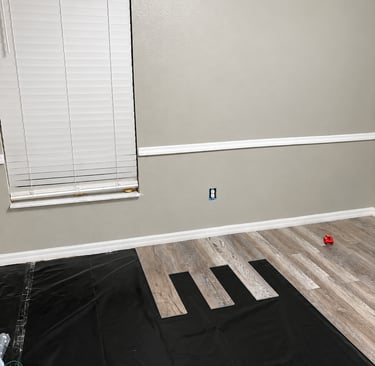
After removing the old carpet, pulling thousands of staples, cleaning the concrete slab, and dealing with the dusty popcorn ceiling, it was finally time to install the new floor.
If you're thinking about installing vinyl plank flooring on a concrete floor yourself, this guide walks you through the process I followed, the tools I used, the mistakes I wanted to avoid, and the lessons I learned during my own bedroom renovation.
You don't need years of construction experience to install vinyl plank flooring. With good preparation, patience, and the right tools, it's a project many homeowners can complete themselves.
Before You Start
The quality of your finished floor depends on the preparation underneath it.
Before installing the first plank, make sure you have already:
Removed the old carpet and padding.
Removed tack strips and carpet staples.
Cleaned the concrete floor thoroughly.
Repaired any damaged areas.
Installed a vapor barrier if recommended by the flooring manufacturer.
If you're just beginning your project, these guides can help:
How I Removed Old Carpet, Padding, and Tack Strips From My Bedroom Floor
How to Remove Carpet Staples from a Concrete Floor: What I Learned During My Bedroom Renovation
Cleaning and Preparing a Concrete Slab for New Flooring: A DIY Guide Before Installation
Tools and Materials
For my project I used:
Vinyl plank flooring
Vapor barrier
Utility knife
Tape measure
Rubber mallet
Pull bar
Tapping block
Spacers
Straight edge
Pencil
Safety glasses
Knee pads
Having everything ready before you begin makes the installation much smoother.
Step 1 – Plan Your Layout
Before opening the first box, measure the room carefully.
Think about:
Which direction the planks will run.
Where the last row will finish.
Doorways and closets.
Expansion gaps around the walls.
Taking a few extra minutes here can prevent awkward cuts later.
Step 2 – Install the Vapor Barrier
Since my flooring was installed over a concrete slab, I installed a vapor barrier first.
Concrete can contain moisture even when it looks dry.
A properly installed vapor barrier helps protect your flooring from moisture over time.
Always follow the flooring manufacturer's recommendations.
Step 3 – Install the First Row
The first row is the most important.
If it starts crooked, every row after it becomes more difficult.
I took extra time checking alignment before locking the remaining planks together.
This saved a lot of frustration later.
Step 4 – Continue Across the Room
Most click-lock vinyl planks install fairly quickly once the first few rows are straight.
As I worked across the room I constantly checked:
Joint alignment
Expansion gaps
Tight connections
Surface level
Taking your time usually produces better results than trying to finish quickly.
Step 5 – Cut Around Obstacles
Door frames, vents, and corners usually require custom cuts.
Measure twice before cutting.
A small mistake can waste an entire plank.
Step 6 – Install the Final Row
The final row often requires ripping planks lengthwise.
Although this part can take the most time, it gives the room a finished appearance.
Don't rush the last row.
Lessons I Learned
Every DIY project teaches something.
Here are a few lessons from mine.
Preparation takes longer than installation.
A clean concrete floor makes installation easier.
Measure every cut carefully.
Knee pads are worth buying.
Keep checking that every plank locks completely before moving on.
Read the flooring manufacturer's instructions before starting.
Can Beginners Install Vinyl Plank Flooring?
Yes.
If you're comfortable measuring, making simple cuts, and following instructions, this is one of the more beginner-friendly flooring projects.
The preparation work often requires more effort than installing the flooring itself.
How Much Did My Project Cost?
Approximate project costs:
ItemCostVinyl Plank Flooring (7 Boxes)$469Vapor Barrier$56Installation ToolsAbout $100Miscellaneous SuppliesAbout $50
Estimated Total: Approximately $675 before taxes.
Prices will vary depending on the flooring brand, room size, and your location.
Helpful Tip: Calculate Before You Buy
One mistake many homeowners make is buying too few—or too many—boxes of flooring.
Before heading to the store, use the DIY Handymen Flooring Calculator to estimate how many boxes of vinyl plank flooring your room requires.
A few minutes of planning can help you purchase the right amount of material and may save you an extra trip to the store.
Frequently Asked Questions
Can vinyl plank flooring be installed over concrete?
Yes. Many vinyl plank flooring products are designed for concrete subfloors, provided the surface is clean, level, and meets the manufacturer's moisture requirements.
Do I need a vapor barrier?
Many installations over concrete require one. Always follow the flooring manufacturer's instructions for your specific product.
Is vinyl plank flooring waterproof?
Many products are waterproof, but the overall installation still needs proper preparation to protect against moisture and ensure long-term performance.
How long does installation take?
The time depends on the room size, layout, and your experience. Preparation often takes longer than laying the planks themselves.
Final Thoughts
Installing vinyl plank flooring on a concrete floor may seem intimidating at first, but careful preparation makes a big difference.
For me, the hardest part wasn't installing the flooring—it was everything that came before it: removing the old carpet, pulling staples, preparing the concrete slab, and making sure the room was ready.
Once that work was finished, the installation became much more manageable.
If you're willing to take your time and follow each step carefully, installing vinyl plank flooring can be a rewarding DIY project that transforms the look of your room.
Continue Your Bedroom Renovation Series
If you're following the same renovation process, these guides may help:
Bedroom Renovation Cost Breakdown
How I Removed a Popcorn Ceiling: Tools, Mistakes, Dust Control, and Lessons Learned
Recommended Products
If you're planning a similar project, consider comparing:
Vinyl plank flooring options
Vapor barriers for concrete subfloors
Flooring installation kits
Knee pads
Rubber mallets
Pull bars and tapping blocks
Utility knives
Tape measures
Choose products that match your flooring manufacturer's recommendations and your project's requirements.